You [Gerald Bauer¹] have been permanently banned [for life] from participating in r/ruby (because of your writing off / outside of r/ruby). I do not see your participation adding anything to this [ruby] community.
-- Richard Schneeman (r/ruby mod and fanatic illiberal ultra leftie on a cancel culture mission)
¹: I know. Who cares? Who is this Gerald Bauer anyway. A random nobody for sure. It just happens that I am the admin among other things of Planet Ruby.
Case Studies of Code of Conduct "Cancel Culture" Out-Of-Control Power Abuse - Ruby - A Call for Tolerance On Ruby-Talk Results In Ban On Reddit RubyUpdate (August, 2022) - A Call for More Tolerance And Call For No-Ban Policy Results In Ban On Ruby-Talk (With No Reason Given)
>  I just banned gerald.bauer@gmail.com.
>
>  -- SHIBATA Hiroshi
>
>> THANK YOU
>>
>>  -- Ryan Davis
>>
>>
>> My full support to moderators.
>>
>> -- Xavier Noria
>>
>> My full support to moderators.
>>
>>  -- Carlo E. Prelz
>>
>>  That's fun.
>>
>>  -- Alice
« Ruby Pixel Art Week 2021, April 19th to April 25th - 7 Days of Ruby (Graphics) Gems
Day 1 - chunky_png Gem - Turn Pixelated Billie Eilish and Lady Gaga Portraits into True 24x24 Pixel Art
Written by Gerald Bauer
What’s Chunky PNG?
The chunky_png gem let’s you read and write pixel images in the Portable Network Graphics (.PNG) format.
Out of Many, One - 24x24 Pixelator
Let’s wipe-up a little pixelator that turns “faux” pixelated portraits into true 24x24 pixel art.
Let’s read in a copy of a Billie Eilish portrait in .png, that is,
billie-eilish-xl.png.

require 'chunky_png'

img = ChunkyPNG::Image.from_file( './billie-eilish-xl.png' )
Let’s print out the original image size and calculate some pixel measurements for the target true 24x24 pixel art image size.
class Pixelator

  def initialize( img, width=24, height=24 )
    @img    = img
    @width  = width
    @height = height

    ## calculate pixel size / density / resolution
    ##   how many pixels per pixel?
    @xsize, @xoverflow = img.width.divmod( width )
    @ysize, @yoverflow = img.height.divmod( height )

    puts "minify image size from (#{@img.width}x#{@img.height}) to (#{width}x#{height})"
    puts "  pixel size (#{@xsize}x#{@ysize}) - #{@xsize*@ysize} pixel(s) per pixel"
  end
Let’s try:
pix = Pixelator.new( img )
resulting in:
minify image size from (992x992) to (24x24)
  pixel size (41x41) - 1681 pixel(s) per pixel
That tells us that the “faux” pixelated portrait uses a 41x41 matrix, that is, 1618 pixels for a single true pixel if converted / minified without loss from 992x992 to 24x24.
Without loss?
Let’s generate an image that shows the pixel grid. Let’s use
a 10 pixel spacing.
Add inside the Pixelator class:
  def grid( spacing: 10 )
    width  = @img.width  + (@width-1)*spacing
    height = @img.height + (@height-1)*spacing

    img = ChunkyPNG::Image.new( width, height, ChunkyPNG::Color::WHITE )

    @img.width.times do |x|
      xpixel = x/@xsize
      @img.height.times do |y|
        ypixel = y/@ysize

        ## clip overflow pixels
        xpixel = @width-1   if xpixel >= @width
        ypixel = @height-1  if ypixel >= @height

        color = @img[x,y]
        img[x + spacing*xpixel,
            y + spacing*ypixel] = color
      end
    end
    img
  end
And let’s try:
pix_grid = pix.grid( spacing: 10 )
pix_grid.save( './billie-eilish-grid.png' )
Let’s have a looksie:

What a lucky day!
For sure - not 100% picture perfect aligned to the pixel grid
but using a pragmatic the 50% majority color “winner takes all” forumla
is good enough.
Let’s add a pixel sampler to the Pixelator class:
# pixels by coordinates (x/y) with color statistics / usage
  def pixels
    @pixels ||= begin
                  pixels = []
                  @img.width.times do |x|
                    xpixel = x/@xsize
                    @img.height.times do |y|
                      ypixel = y/@ysize

                      ## skip/cut off overflow pixels
                      next if xpixel >= @width || ypixel >= @height

                      color = @img[x,y]
                      colors = pixels[xpixel+ypixel*@width] ||= Hash.new(0)
                      colors[ color ] += 1
                    end
                  end

                  ## sort pixel colors by usage / count (highest first)
                  pixels = pixels.map do |pixel|
                                         pixel.sort do |l,r|
                                                      r[1] <=> l[1]
                                                    end.to_h
                                      end
                  pixels
                end
  end

  def pixel(x,y)  pixels[x+y*@width]; end
Add the pixelate method that minifies the portrait to true 24x24 pixel art:
  def pixelate
    img = ChunkyPNG::Image.new( @width, @height )

    @width.times do |x|
      @height.times do |y|
        pixel = pixel( x, y )
        color = pixel.keys[0]
        img[x,y] = color
      end
    end
    img
  end
It’s showtime! Let’s try:
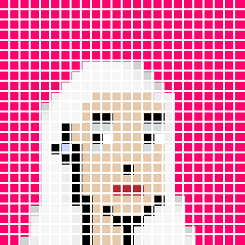
pix_24x24 = pix.pixelate
pix_24x24.save( './billie-eilish-24x24.png' )
Voila!

All together now - Let’s (re)do Lady Gaga
Let’s read in a copy of a Lady Gaga portrait in .png, that is,
lady-gaga-xl.png.

img = ChunkyPNG::Image.from_file( './lady-gaga-xl.png' )
And let’s reuse the Pixelator:
pix = Pixelator.new( img )
resulting in:
minify image size from (992x992) to (24x24)
  pixel size (41x41) - 1681 pixel(s) per pixel
And let’s try again:
pix_grid = pix.grid( spacing: 10 )
pix_grid.save( './lady-gaga-grid.png' )

pix_24x24 = pix.pixelate
pix_24x24.save( './lady-gaga-24x24.png' )
Voila!

Find Out More
References
- Home :: github.com/wvanbergen/chunky_png
- Gem :: chunky_png
- Docs :: chunky_png
Built with Ruby
(running Jekyll)
on 2023-01-25 18:05:39 +0000 in 0.371 seconds.
Hosted on GitHub Pages.
</> Source on GitHub.
(0) Dedicated to the public domain.